There’s a special kind of satisfaction that comes from taking something worn and making it wonderful again.
This is the story of how I turned a neglected wicker chair with a broken seat into a piece of art, all with a simple wicker chair seat repair.
Venturing to my local thrift store, I stumbled upon a chair that most would overlook, available for a mere $6.98 due to its compromised condition.
But I saw potential where others saw a deal-breaker. With experience under my belt, I was confident in my ability to undertake a wicker chair seat restoration, breathing new life into the piece.
What followed was a process of transformation, from removing the dilapidated caning to padding the seat anew, and wrapping it in a cherished fabric—an all-time favorite of mine once offered by the now-closed Hancock Fabrics and currently sought after in Michaels’ online collection.
Embracing the DIY spirit, I want to share with you how to repair wicker chair seats, inspire your next project, and prove that when it comes to furniture, there’s no such thing as beyond repair.
Follow me on this journey as I detail each step, from salvaging the chair to the final celebratory placement in my booth, hinting at the spindle legs that caught my eye and the cost-effective approach that left my wallet nearly as happy as my heart.
Preparation for Wicker Chair Seat Repair
As a seasoned DIY enthusiast, I know that a successful wicker chair seat repair starts long before the fixing begins—it’s all in the preparation.
My latest project, transforming a discounted $6.98 thrift store find into a treasured piece, exemplifies just that. With a clear assessment, the right tools, and a systematic approach, even the most damaged wicker seat can be given a new lease on life.
Let me guide you through the initial steps required before diving into repairing a wicker chair seat.
Identifying the Damage and Assessing Your Chair
The first step in fixing a wicker chair seat is to thoroughly examine your chair. Squinting under the bright workshop lights, I checked for damaged areas, running my fingers along the seat’s surface to detect any hidden loose ends.
This tactile approach is essential, as some damage may not be immediately visible. Once I pinpointed all the areas that needed attention, it was time to strategize the repair process for the wicker chair seat.
Gathering Necessary Materials and Tools
In the world of DIY, having the right materials and tools at the ready can make all the difference. For this repair, I amassed wood glue, heavy-duty scissors, an Exacto knife, needle-nose pliers, and a fresh set of replacement reeds.
It’s a lineup that promises precision and durability, ensuring every step of the repairing process goes smoothly. These tools are the silent workhorses behind any successful fixing of a wicker chair seat.
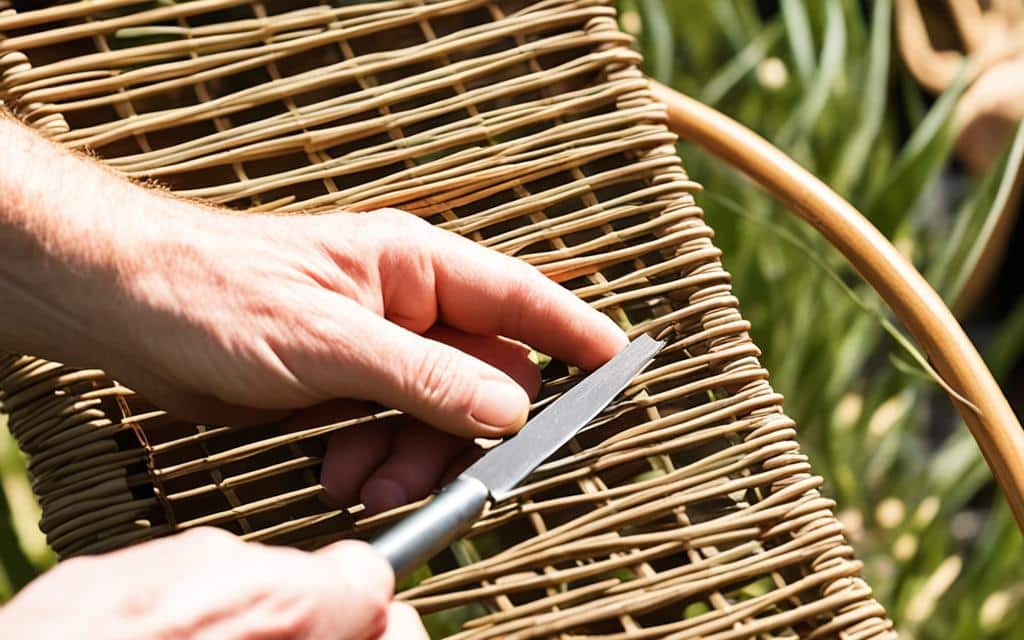
Removing Old Damaged Caning and Cleaning the Area
Before I could begin the physical restoration, the damaged caning had to go. I used my Exacto knife with the utmost care to snip away the compromised material, revealing the bare skeleton of the chair beneath.
This process is like prepping a canvas for an artist, providing a clean base on which to build the new structure. Each cut was measured, each removal mindful of the integrity of the remaining wicker.
This attention to detail during the cleaning phase sets the stage for a meticulous and long-lasting wicker chair seat restoration.
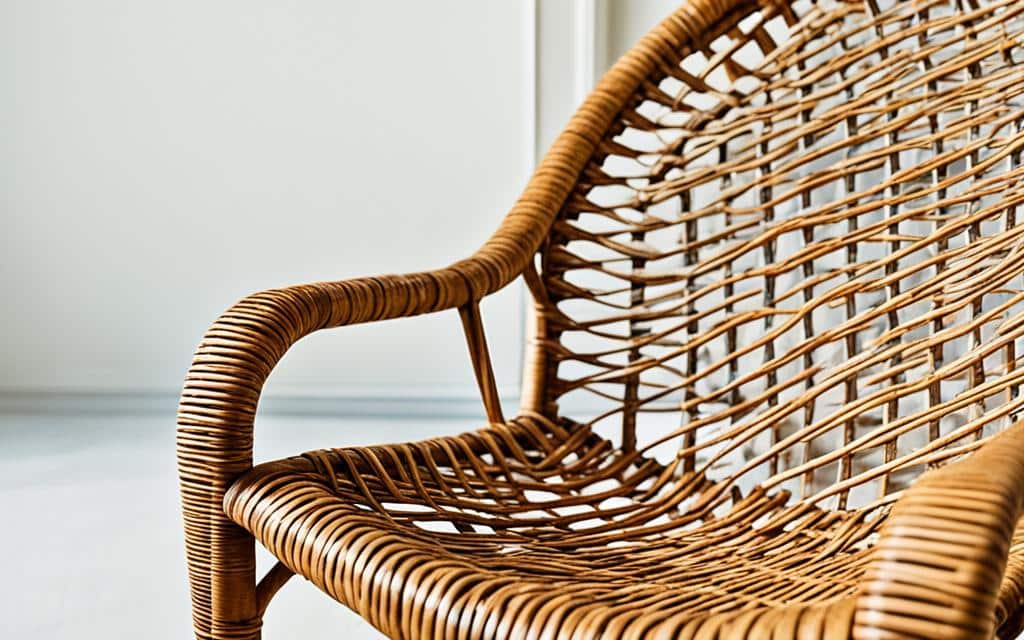
Steps to Restore the Wicker Chair Seat
The journey to revitalize a wicker chair often starts with finding the perfect candidate for refurbishment.
As I embarked on the delicate process of wicker chair seat maintenance, I discovered that reviving the charm of a frayed seat begins with patience and the right technique.
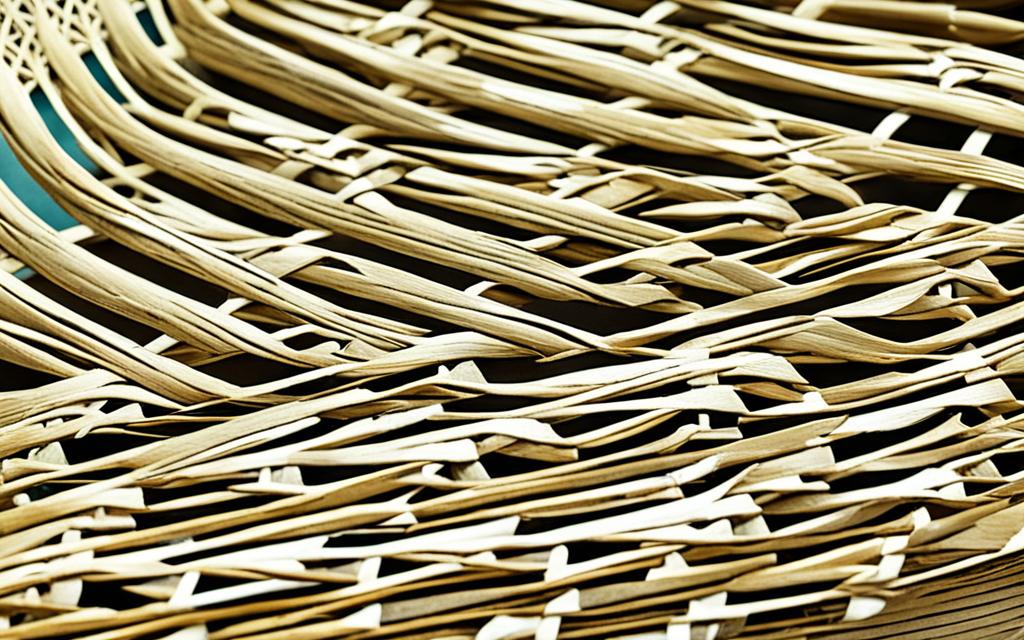
First, it was crucial to find suitable replacement reeds that would blend seamlessly with the chair’s existing material, a nod to the memories embedded in its woven patterns.
Submerging the reeds in warm water, I waited patiently as they absorbed moisture, becoming pliable—ready to be coaxed into their new role as part of the chair’s renewed narrative.
This preparatory step is essential to preventing breakage during the weaving process, critical for effective wicker chair seat refurbishment.
Starting from a hidden spot on the chair ensured that any learning curves in my weaving wouldn’t detract from its aesthetic.
With careful, considered motions, I interlaced the fresh, supple reeds through the chair’s intricate pattern, my fingers and pliers dancing in tandem to mimic the original craftsmanship.
The joy of weaving in that final reed was akin to placing the last piece of a puzzle, completing a picture that once seemed hopelessly fragmented.
Yet, it was with the application of wood glue to the reeds’ ends that the promise of durability was sealed, ensuring that each strand lay secure in its place.
It is a step not to be rushed, for the adhesive must set unfettered, the bond unchallenged by premature movement, embodying the essence of careful wicker chair seat maintenance.
As the glue cured, I proceeded with the finishing touches—affixing carpet tacks to conclusively fix the reeds, a necessity for the long-term preservation of the chair’s structure and comfort.
It’s these details that mark the difference between a temporary fix and a lasting seat refurbishment.
The investment of time and precision in each step brings with it the rewarding sight of a beautifully restored wicker chair, ready to offer comfort and charm for years to come.
Finishing Touches for Your Wicker Chair Seat Restoration
After meticulously weaving and securing the seat’s new foundation, it’s time to refine our wicker chair to make it display-ready. Every attention to detail reinforces the craftsmanship of our wicker chair seat repair.
The promise of a polished final product is what makes the restoration process so fulfilling. So let me walk you through those final steps that made my wicker chair not just repaired but truly restored.
From trimming to the perfect trim application, these accents are what can set your piece apart.
Securing the New Seat and Trimming Excess Material
Following the weaving of the new reeds, I secured the freshly shaped seat to the chair’s frame with discrete nails in each corner, ensuring it stayed firmly in place.
Any additional material beyond what was needed was judiciously trimmed off, allowing for a snug fit and a clean edge. This approach helped me in creating a harmonious silhouette for the chair, maintaining the integrity of its design while ensuring comfort and functionality.
Creating and Applying Double Welt Trim or Alternative Solutions
It’s the small details like double welt trim that encapsulate the essence of quality in wicker chair seat restoration.
Sewing enthusiasts will appreciate the personal touch this brings, but if sewing isn’t your forte, fear not—gimp trim is an excellent substitute to mask the nuts and bolts of your hard work.
The trim was the final flourish, applied with a touch of hot glue, capping off the edges with a professional and aesthetically pleasing finish. My chair now boasted a new level of sophistication, the staples concealed, its outline defined by the trim’s clean lines.
Maintenance Tips to Prolong the Life of Your Wicker Chair
To maintain and prolong the vitality of our restored wicker chair, a regular cleaning regime with suitable solutions is advisable. Use gentle cleansers and avoid harsh chemicals to prevent any damage to the wicker fibers.
Keep your chair out of direct sunlight to thwart fading and degradation of the materials. And if you want to add an extra layer of protection, consider a coat of resin-based primer for a resilient finish.
Through these careful maintenance practices, our labor of love will stand the test of time, ensuring the chair continues to offer its unique charm and comfort for years to come.
FAQs
Q: What Spurred You To Repair The Wicker Chair Seat Yourself?
A: After finding a wicker chair with a broken seat for under , I was inspired to tackle the transformation myself.
The chair’s potential and the spindle legs caught my eye, so I refused to let the damaged seat deter me. Besides, I was excited to give the chair a new life with materials I already had, thereby keeping costs low.
Q: How Do You Identify And Assess The Damage To A Wicker Chair Seat?
A: To assess the damage, place the chair under good lighting and use your hands and touch to identify any loose strands where visibility might be limited.
I check for fraying, broken strands, and any parts that need stabilizing to determine the extent of the damage before starting the repair.
Q: What Materials And Tools Are Required For Repairing A Wicker Chair Seat?
A: The materials and tools you’ll need include wood glue, heavy-duty scissors or an Exacto knife, needle-nose pliers, replacement reeds, a hot glue gun for trim, batting, a fabric of your choice, staples, and optionally, carpet tacks for securing the seat.
Q: What Is The First Step In Repairing The Wicker Chair Seat?
A: The first step involves carefully removing the old damaged caning and cleaning the area. By using scissors or an Exacto knife, you should cut away the damaged material and prepare a clean base for the new caning.
Q: How Do You Begin Restoring The Seat On A Wicker Chair?
A: Restoration begins with prepping the replacement reeds. The reeds should be immersed in warm water to become flexible.
Remove excess moisture before beginning the weaving process, starting from an inconspicuous point and interlacing the reeds following the original pattern of the chair.
Q: What Are The Finishing Touches For A Wicker Chair Seat Restoration?
A: Once the seat has been woven and secured, trim any excess material for a neat finish.
Then, if using fabric, carefully staple it onto the seat, and add double welt trim or gimp trim to hide the staples and enhance the chair’s aesthetic. This step involves meticulous cutting and gluing to achieve a professional and polished look.
Q: Can You Provide Any Maintenance Tips To Prolong The Life Of A Wicker Chair?
A: Certainly! Regular cleaning with a gentle solution, avoiding exposure to direct sunlight, and considering a coating of primer or lacquer for protection can significantly extend the life of your wicker chair.
Also, being gentle with the material and checking periodically for any signs of wear or loose strands is essential.